As part of the "study abroad" portion of our AFS trip to Ghana, the students and I got to participate in Batik lessons. Batik is a wax-relief way of creating fabric design. It's quite popular in a lot of African cultures. The process itself is simple enough, although we learned quickly that there is a high level of skill needed to achieve the perfection you ultimately would want.
But, it is something that I think I'd like to try on my own at home. Or just do again as part of a workshop/class. For those of you who are more into arts and crafts, here's the process if you want to try it at home.
Step 1: Concept Creation
First, you need to do a bit of sketching to come up with possible designs you want to see on your fabric. It's best to come up with at least two different ones. Something we didn't realize as we were drawing is that you want these to be bold and be able to be somewhat large/big. If it's too small, it because an issue later.
Step 2: Copy your designs on to foam
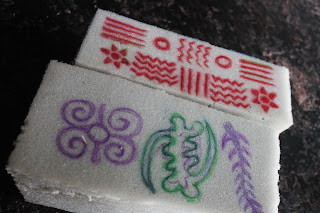
Below are the two designs I came up. The first was just a bit abstract shapes and lines. It was actually almost too small (it might have been better if the lines were a bit thicker). For the second design, I just put together some ancient
Adinkra symbols--the one on the left means "strength and humility," the middle symbol means "except God/except for God," and the last symbol means "faith and trust in God." To do what I really wanted these should also have been a bit bigger and spaced apart more.
Step 3: Use a blade to cut out your designs
The parts that are in color were going to stand out, while the white was going to be cut out. That way when you stamp the fabric later, you see the designs clearly. This is hard to do if your lines are super small. And you have to make sure you're digging into the foam in the right direction, otherwise you may actually cut off your design. This step was the hardest for all of us. I actually didn't even end up cutting out mine... our teachers did it for me.
On my Adinkra pattern, I had actually wanted the outside two symbols to stand up and have the inside symbol simply be outlined (so I would have dug out the center of the symbol). But because they were so close together and my lines were pretty small, that wasn't going to work.
 |
| You can see the shapes cut out in my Adrinka patter and in the ones the students made toward the back. |
A few of the students had to scrap their initial plans and just go with one of the ones the shop already had cut and used in the past. So, if you're trying this at home, expect to make some mistakes and try again!
Step 4: Dip the foam into wax
You'll need to have hot wax (not sure if there is a specific type of wax that's needed, but I'm sure that's not difficult to figure out) melting over a fire. And then you'll dip the foam into it. If it's new foam, it needs to be soaked into the wax a bit and then hit against a table/smooth surface. Basically you want to make sure that it's gotten a bit "old" so that the wax truly gets soaked up into the foam when you're ready to start printing.
 |
| Our instructor and shop owner dipping my foam into the wax |
 |
| Here's she's pressing my foam against the table to get it "aged" |
Step 5: Begin stamping your fabric
You start with a white piece of fabric (we all had between 1 and 2 yards). Start with one of your pieces of foam and begin stamping your fabric in whatever pattern or style you want. I learned the hard way that you do NOT want to PRESS the foam down (you get a nice puddle of wax), but you also want to lightly move the foam about to make sure that the entire print is capture (especially when yours has small lines like mine did). The sections of my fabric that look the best are the ones that our instructor did. And when I finally got the handle of it, I also realized that I wasn't very good at making straight lines or keeping even spacing.
 |
| Her stamping |
 |
| Me stamping |
Step 6: Time to Dye!
If you plan to just do one color, then you'll actually want to stamp your second print onto the white fabric. But if you'd like to have two different colors in your finished look, then it's time to do your first dye. She did the mixing... but basically it was dye, caustic powder and salt. I'm pretty sure if you buy any fabric dye and follow the instructions you'll be fine. Once the dye job is finish, you'll need to let the color "bleed" out by hanging it on the line and let the fabric dry.
Once that's done, you get to repeat steps 4-6 with your second pattern. Something that wasn't explained well is that your first color needs to be lighter than your second color. You can't do the same color twice. So I wanted a gold fabric and choose gold as my color... but then for my second color, I had to go darker and had to go with orange :-( If I had understood the way the dying worked, I would have chosen yellow as the first color and then did the second dye job gold.
 |
| Stamping on my second pattern |
 |
| Fabric drying so the second color can soak in/show |
Step 7: Melt off the wax
You've printed, you've dyed. Now it's time to get all that wax off so you can have your final product. You'll want to make sure your dye has had time to drip through the fabric and you'll want to make sure your fabric isn't soaking anymore. Damp is okay. Then you want really hot water. They actually just had a pot over a wood fire so that the water was constantly being heated/staying hot. Each piece of fabric was then dropped into the hot water, one or two at a time. Sometimes they would stir it around a little bit. And then they would get a small cup to pick up all the stray wax pieces that were coming off so they couldn't re-stick to the fabric. Once no more stray wax pieces were coming off and there were none to pick out with the cup, the fabric was transferred to cold water. It was hand washed (no soap) to get any last bits of wax off before transferred to another bucket of cold water to sit in for a bit. Then it was hung back on the line to dry.
 |
| Putting the fabric into the hot water |
 |
| Taking out the wax pieces |
 |
| Washing out any remaining wax and then letting the fabric sit in cold water |
Step 8: Let it dry and you're done!
The fabric hangs on the line and once it's dried, you can take it to a tailor or seamstress to get sewn! I got a dressed made, another student made shorts, one made pants. Not sure what the others will do with theirs. But it was definitely a fun experience. Here's all of our fabrics!
 |
| The designs the kids created |
 |
| My completed fabric design |


Comments
Post a Comment